
Chart of Accounts
The Chart of Accounts is an organized list of all the financial accounts in in your business. It serves as the backbone of your bookkeeping, helping you stay categorize and track financial transactions in a structured way.
Where Can I See My Chart of Accounts?
Go to the “Accounting Tab” in the side bar or navigate to https://use.kick.co/accounting and click on Chart of Accounts in the list.
How is the Chart of Accounts different from Categories?
In Kick, the Chart of Accounts serves as the foundation for organizing financial data, while Categories are how transactions are classified within that structure.
Here are some key differences:
The Chart of Accounts is a high-level financial structure that organizes all of your business’s financial accounts (assets, liabilities, equity, income, and expenses).
Categories are used to classify individual transactions (such as office supplies, meals, or advertising expenses).
Every transaction in Kick is assigned to a Category, which then maps to the correct Account in the Chart of Accounts.
How do I add Custom Accounts into my Chart of Accounts?
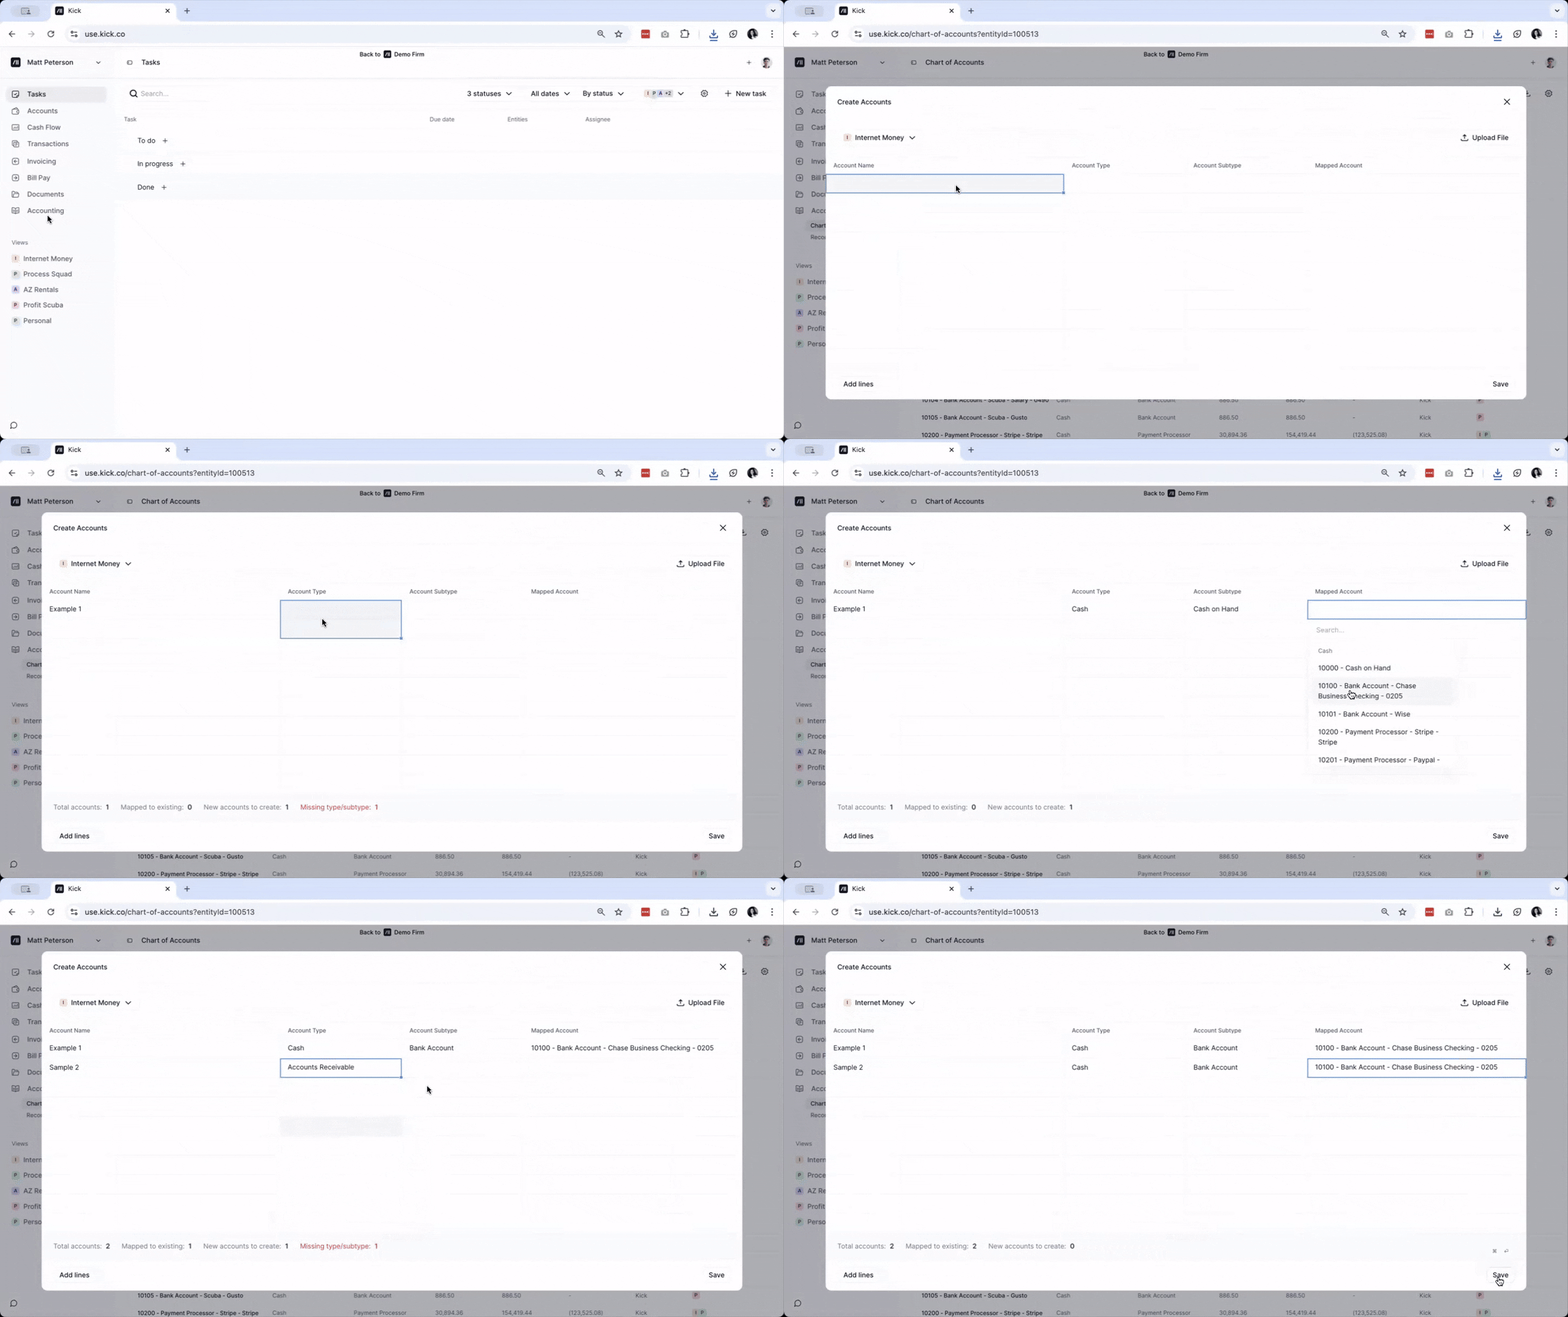
Go to the Accounting Tab and click on Chart of Accounts or go here: https://use.kick.co/chart-of-accounts.
Click on Add accounts
Select the Entity that you want to add Custom Accounts to
Enter the Account Name then select the Account Type, Account Subtype, and Mapped Account.
Once done, click Save
NOTE: You can add multiple Custom Accounts at the same time. If you need more lines, click on on the Add lines button at the lower left corner of the window.
How do I import Custom Accounts into my Chart of Accounts?
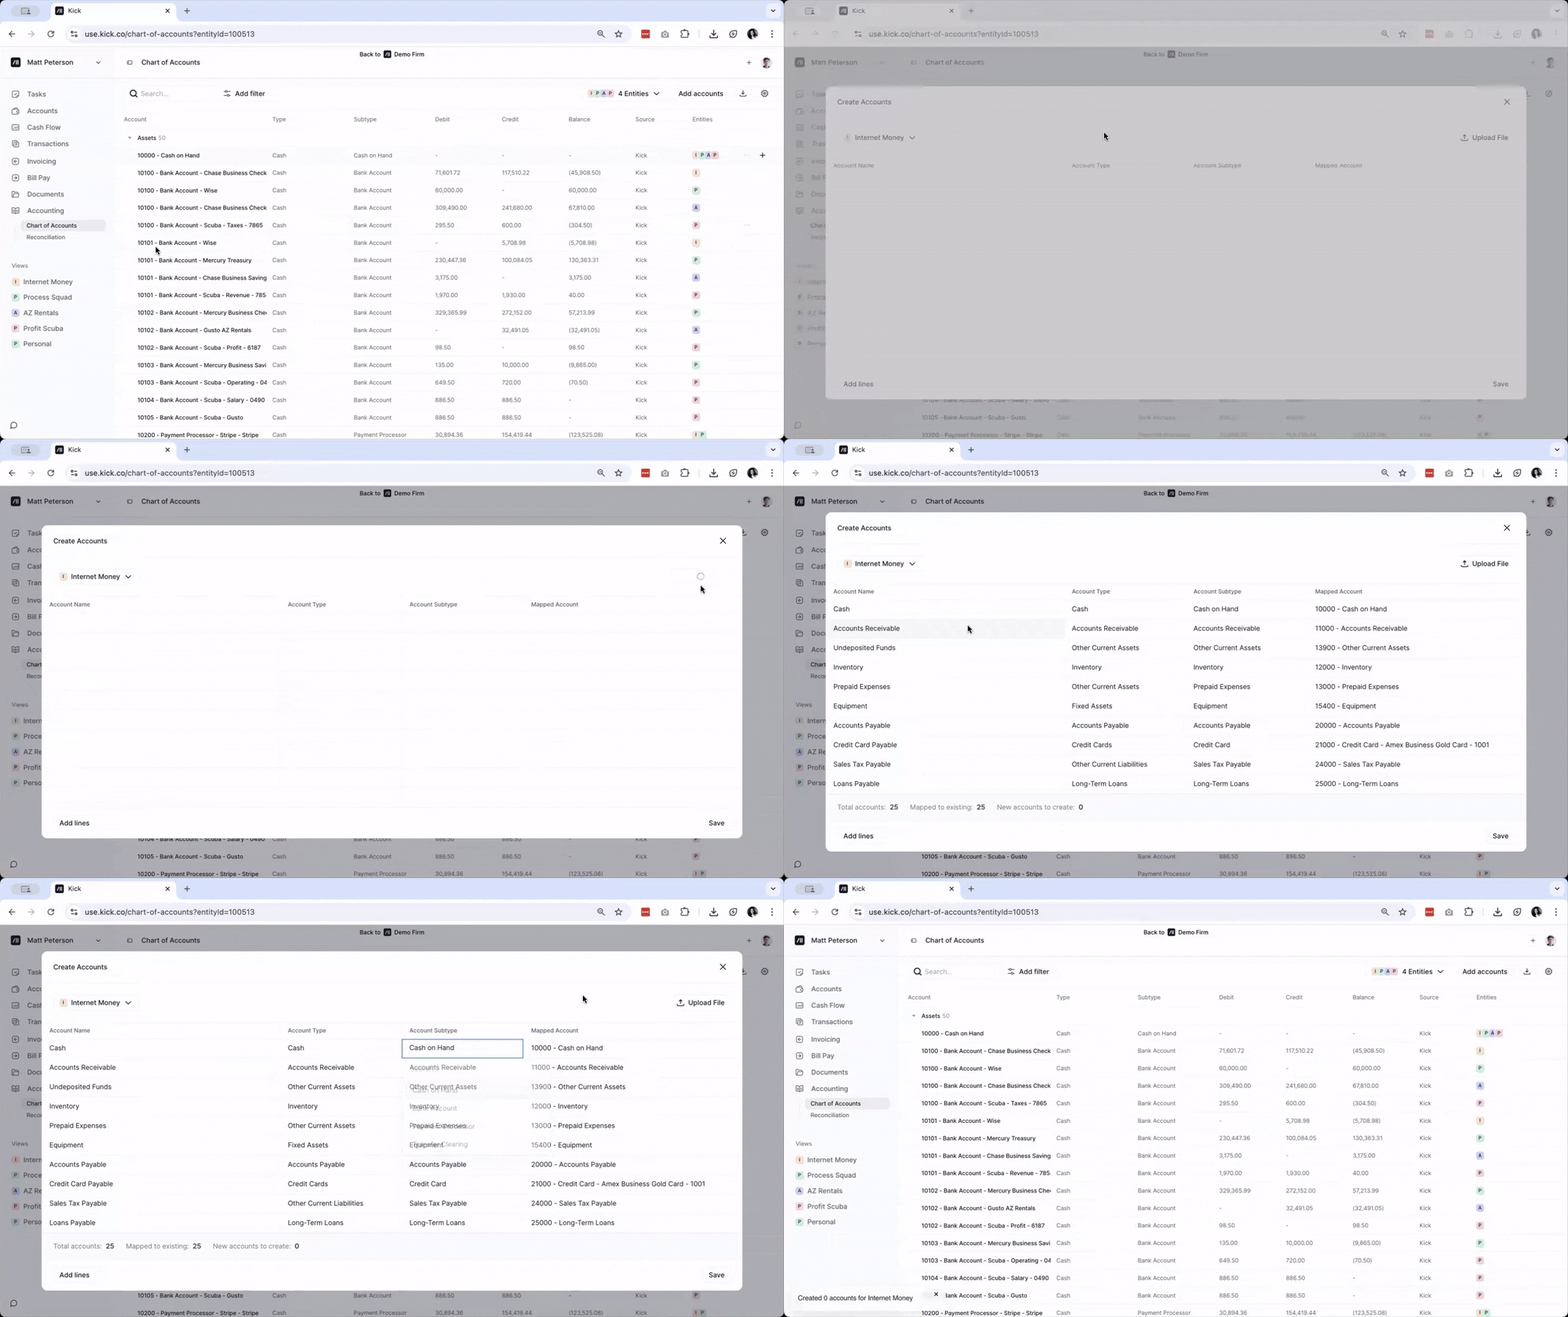
Go to the Accounting Tab and click on Chart of Accounts or go here: https://use.kick.co/chart-of-accounts.
Click on Add accounts
Select the Entity that you want to add Custom Accounts to
Click on Upload File and wait for your file to be processed. It is recommended to upload an xls or csv file.
Check if the Account Name, Account Type, Account Subtype, and Mapped Account sections are correct. Edit as necessary.
Once done, click Save
How do I edit or delete a Custom Account in my Chart of Accounts
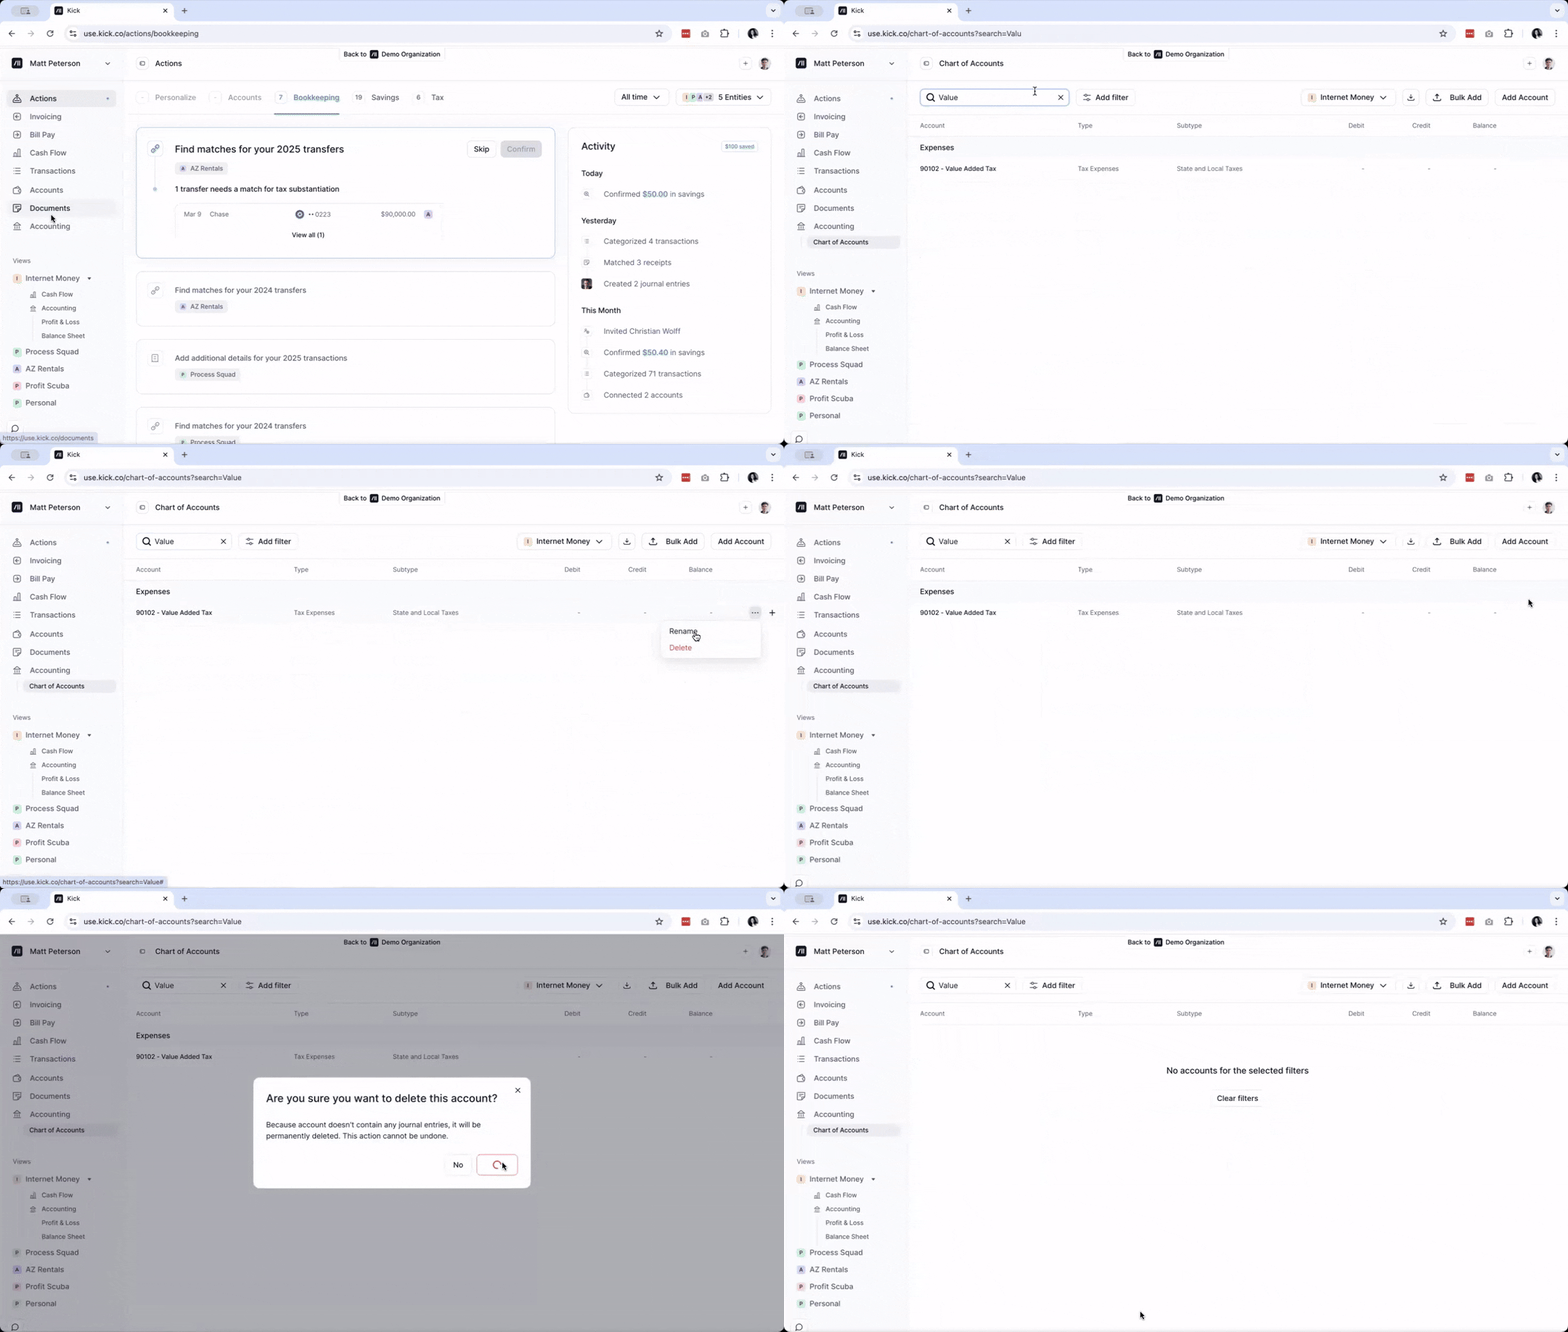
Go to the Accounting Tab and click on Chart of Accounts or go here: https://use.kick.co/chart-of-accounts.
Search for the Custom Account that you wish to edit or delete.
Click on the 3 dot menu.
To edit, click on Rename. Edit the Custom Account and click Rename.
To delete, click on Delete. A pop-up will appear to confirm if you wish to delete the Custom Account. Click Delete.
How can I edit Subtypes of Chart of Accounts?
In Kick, account subtypes can be edited on manually created accounts, but not on Kick's default/system accounts.
To update a subtype:
1. Go to Accounting → Chart of accounts
2. Find the account and click the three dots
3. Select Edit account
4. If the account was manually created, you'll see a Subtype dropdown — pick the correct one and save. If you don't see the subtype field, the account is likely a default Kick account. In that case, create a new account under the subtype you want and recategorize transactions over to it.
How do I replace the Chart of Accounts with my current Chart of Accounts from another platform?
Kick does not currently support a full "swap out the entire chart of accounts" in one step, but you can get your COA into Kick by importing it:
Import and map accounts:
Export your Chart of Accounts from the other platform as a CSV or PDF file.
In Kick, open the Entity → Accounting → Chart of accounts
Click Import accounts
Upload your Chart of Accounts export (CSV or PDF)
Review the extracted accounts, then map each to an existing Kick account or create new ones
This adds/maps accounts without wiping existing history. You can archive old accounts you no longer need from the ⋯ menu on each GL row.
Note: If you are migrating from Quickbooks and is subscribed to our Advanced Plan, you can use our Full QuickBooks migration. To do this, go to Integrations → QuickBooks on the Advanced plan. Removing and reconnecting QBO clears prior migration opening balances.
Can I assign additional entities to a Chart of Accounts account?
Yes, but additional entities can only be assigned when the account is first created. Once an account has been created, you can't add more entities to it.
If you need the same account in another entity, create a new account with the same name and same account grouping in that entity. Kick will automatically group these accounts together where applicable.